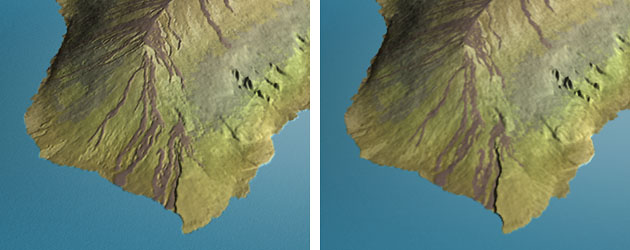
Images draped onto DEMs sometimes can appear stretched and blurred, especially in steep areas when large amounts of vertical exaggeration is used. Bump mapping is a technique that counteracts this tendency, giving landscapes a more natural appearance by depicting subtle light and shadow detail, or bumps, on terrain surfaces. Although bump mapping is more often created from procedural (algorithmic) textures, in this case we will use the draped satellite image itself as the bump map data. Illumination within the 3D scene reacting with contrast information contained within the image, such as forest and lava flow boundaries, will cause these edges to appear embossed.
Hawaiian
lava flows rendered with bump mapping (left) and without (right).
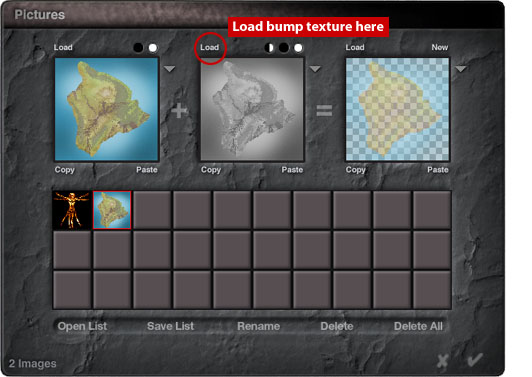
To load the satellite image as a bump map texture:
1. With the DEM selected, go to the Pictures library using the procedure described previously.
2. Click the
load label above the middle preview square (see the illustration below).
Choose the file named drape.psd. Exit the Pictures library.
3. Now you
must enter the daunting world of Bryce's main Material Editor by clicking
the Material
Editor
icon in the Edit palette (it is on the far left side). The following instructions
will guide you through the maze:
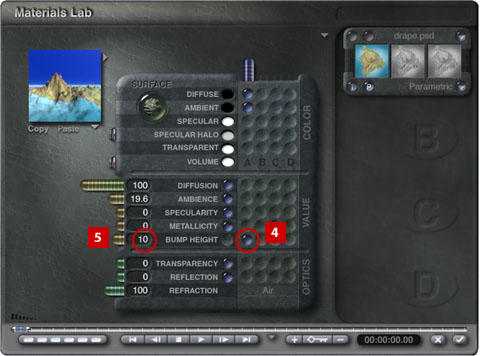
4. In the matrix at the center of the Material Editor, click the empty circular depression where the Bump Height row and A column intersect. A glass-like button will appear where you just clicked (see #4 below).
5. Next, enter a value by pulling the Bump Height slider bar to the left (see #5 below). Alternatively, numeric Bump Height values can entered by clicking directly on the number field. Restraint is advised when assigning bump height values; too much will give the satellite image a coarse appearance.
6. Exit the
Material Editor and then render the final bump mapped image.
Additional Comments:
--Bump mapping effects are non-permanent. To adjust or turn off bump mapping, simply go back to the Materials Lab.
--Custom bump map textures can be created by modifying a duplication of the original satellite image in Photoshop, and then loading the modifyed image as the bump map texture in Bryce. For example, using Photoshop, green forest areas could be selected and given a light application of the noise filter and, perhaps, a touch of Gaussian blur, which would translate to a lumpy forest canopy when used as a bump map. Conversely, diminishing 2D image contrast diminishes the effects of 3D bump mapping--a useful technique for applying variable amounts of bump map texture locally within an image.
--In Bryce, bump map textures are read as 8-bit grayscale data, so there is no qualitative penalty for preparing custom bump map textures in grayscale color mode.