Tom Patterson, U.S. National Park Service
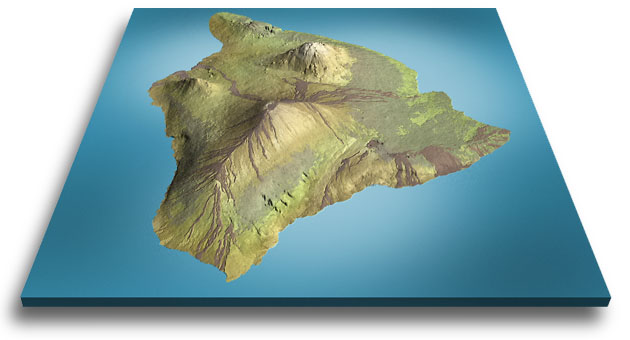
This tutorial introduces an easy technique for draping raster geo-images, including satellite images, aerial photographs, and rasterized vector linework, onto DEM surfaces in Bryce 5. Using a pre-registered 1,024 x 1,024 DEM and satellite image of the Island of Hawaii, you will be shown how to make a 3D landscape visualization similar to the image below. It is just a matter of pushing the right buttons, arrows, knobs, widgets, and other miscellaneous objects that comprise Bryce's unique graphical user interface.
Downloads
In addition to Bryce 5 for Mac 9.x, Mac OSX, or Windows, for this tutorial you will need the sample Hawaiian DEM in Portable Grayscale Map (PGM) format and the satellite image in Photoshop (PSD) format:
Zip archive (3.0MB)
Also, you can download the ready-to-use Bryce 5 file (3.3MB) of Hawaii used to make the scene above. Mac and Windows Bryce 5 files are interchangeable provided that the file includes a ".br5" extension.
Initial Bryce setup
The default settings in Bryce 5 assume that you work on a 13 inch monitor and use the application for creating artistic landscapes from low elevation views. These need to be reconfigured before making 3D maps viewed from higher elevations:
1. After launching Bryce, delete the default infinite plane, which appears as a wireframe grid at the bottom of the scene. Do this by selecting the infinite plane (click on it once, it will turn red when selected) and press the delete key.
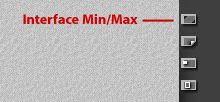
2. The cramped default Bryce GUI can be expanded to completely fill larger monitors by clicking on the Interface Min/Max icon at the right side of the desktop (see the illustration below). Since the Bryce GUI completely takes over your desktop anyway, there is no advantage in using the smaller size.
3. The Bryce project window (the hairline rectangle within which the scene is constructed and rendered) is preconfigured to 540 x 405 pixels. You can give yourself a larger size and/or a different format by going to File/Document Setup. I generally find 800 x 600 pixels to be a good starting point.
4. Bryce opens with default sky and fog settings turned on, which, although great for making artistic landscapes, need to be disabled for cartographic work (at least initially). The following steps will yield a plain vanilla Bryce environment with a white background and white illumination, and without clouds, atmospheric haze, or cast shadows:
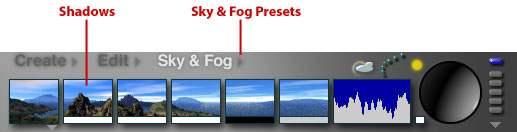
A) At the top of the Bryce desktop click the Sky and Fog label to activate the Sky and Fog palette (see illustration below).
B) Click on the small triangle next to the Sky and Fog label to enter the Sky and Fog Presets. Choose "Simple White Background" from the scrolling list.
C) To remove cast shadows from the scene, click-drag to the left in the Shadows window until the numerical amount reads 0 (displayed at the lower left corner of the Bryce desktop as you click-drag).
DEM importing and editing
DEM importation in Bryce 5 is a snap providing that the DEM is quadratic-sized and in Portable Grayscale Map (PGM) format. The sample DEM of Hawaii just so happens to meet these requirements:
1) In the drop menu, go to File/Import Object and select the hawaii.pgm file that you downloaded earlier. When imported, the DEM will appear as a wireframe terrain object at the bottom center of the Bryce project window.
You will undoubtedly notice the excessive vertical exaggeration on the imported DEM. This can be diminished by two methods:
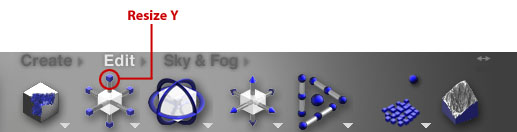
METHOD 1 - With the DEM selected, in the Edit palette (see the illustration below) , click-drag the upper Y axis of the Resize icon to the left until the topographic vertical exaggeration looks about right. Although unscientific, this method is quick and effective for making visual adjustments.
METHOD 2 - For the numerically inclined, click on the tiny "A" next to the selected DEM to activate the Object Attributes dialog (see illustration below). Lessen the Y size at the bottom of the dialog. (Note: sizes are indicated in Bryce units, a somewhat arbitrary unit of measurement unrelated to real world elevations or percent vertical exaggeration, but nevertheless useful for making relative adjustments to vertical scaling). In general, high elevation views require more vertical exaggeration than low elevation views of the same area. Experiment.
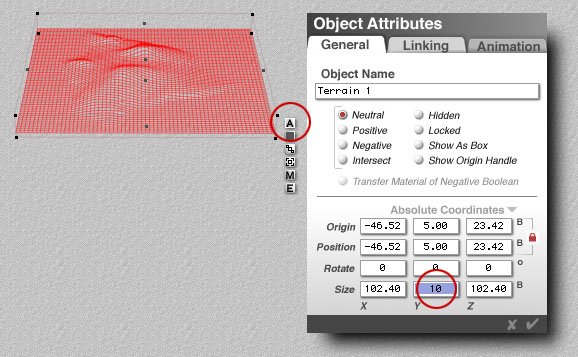
Image draping
In Bryce, as with all 3D landscape software, the image and the DEM upon which it will be draped must register to one another perfectly. Although DEMs in Bryce must conform to quadratic sizes, a draped image can be a square of any size, quadratic or otherwise. I usually prefer that the image used for draping have a resolution at least twice that of the DEM beneath--for instance, draping a 8,192 x 8,192 image on top of a 4,096 x 4,096 DEM, to show surface features with utmost detail and sharpness. However, this approach translates into huge file sizes. In the interest of download time, the tutorial satellite image of Hawaii is a modest 1,024 x 1,024 pixels, the same resolution as the DEM upon which it will be draped.
Draping procedure:
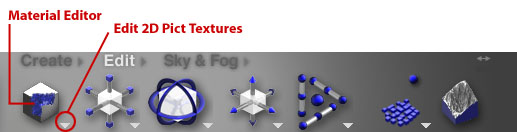
1. In the Edit Palette, click on the small arrow to the right of the Material Editor icon (see the illustration below) and choose the Edit 2D Pict Textures option.
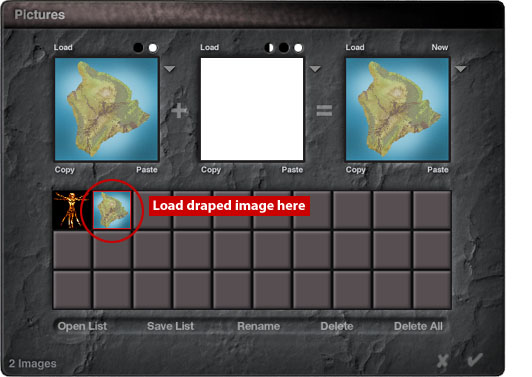
2. The Pictures library then appears (see the illustration below). Load the satellite image of Hawaii into the Pictures library by clicking the empty square to the right of Leo, the default Bryce picture of a da Vinci-like human figure. In the open dialog box that appears, choose the downloaded satellite image named drape.psd.
3. Close the Pictures library by clicking the check mark "okay" at the lower right.
4. In the
main Bryce window click the render button (the lowest ball on the left
side of the desktop) to render the draped satellite image and DEM. Congratulations,
you are done.
Additional Bryce 5 techniques for the adventurous...