Creating Web Map Shaded Relief |
|||||||||
Tom Patterson |
|||||||||
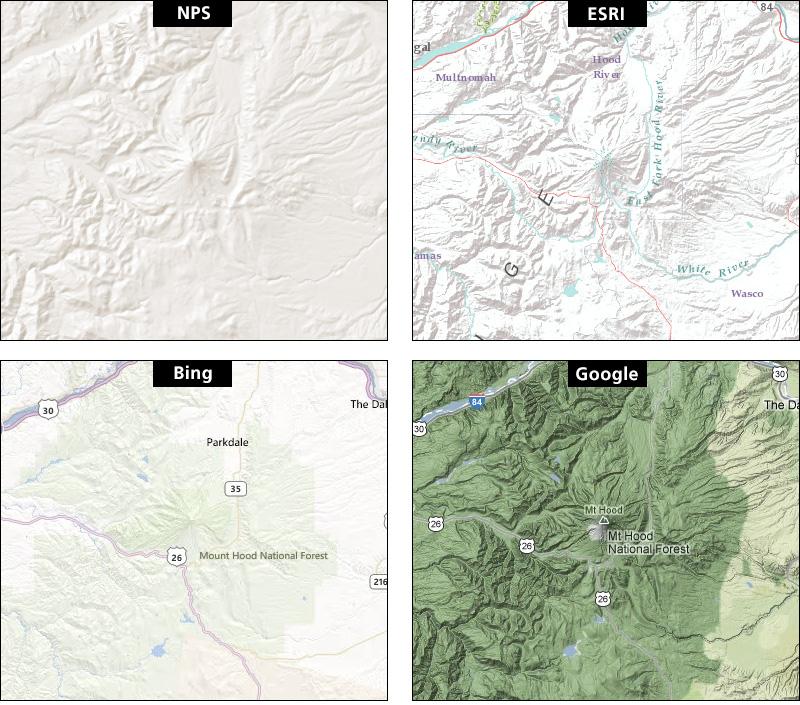
This tutorial about making multi-scale shaded relief resulted from a National Park Service (NPS) web-mapping project that I worked on. The goal was creating generalized shaded relief light enough so as to not interfere with overprinting map information, such as place names and roads, and with enough tonality to do justice to iconic park landscapes. Producing reliefs with consistent detail and density that would flow seamlessly from one zoom level to the next was another aim. The samples below compare the NPS shaded relief for zoom level 9 with commercial web maps. |
|||||||||
 |
|||||||||
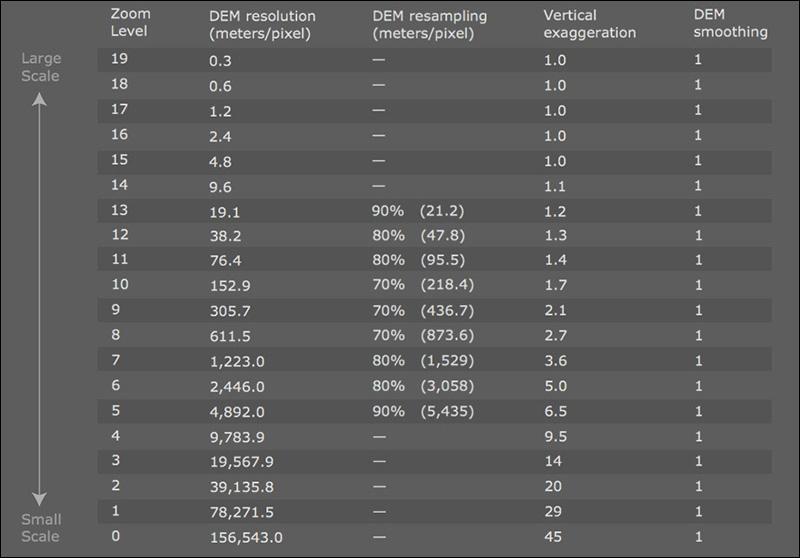
The following chart lists the settings I used for producing the NPS shaded reliefs. All of the reliefs, regardless of zoom level, were rendered with Natural Scene Designer (NSD) Pro 6.0 using default settings: light direction = 315°, light angle = 45°, shading amount = 100%, light ambience = 16%, and with 15% background gray. To render different shaded reliefs for each zoom level, I simply altered the resolution and vertical exaggeration of their respective Digital Elevation Models (DEMs). See the next section on Shaded Relief Tips for details. Click here to obtain a PDF of the chart. The PDF contains additional reference information. |
|||||||||
 |
|||||||||
Shaded Relief Tips Data • You will need elevation data to produce shaded reliefs. For the NPS project I used SRTM30 Plus for the zoom levels 0 to 7 and switched to the USGS National Elevation Dataset (NED) for the larger scales. In this tutorial I use the term "DEM" generically when refering to all types of elevation data. Web Mercator projection • Because most web maps use the Web Mercator projection, WGS84 datum, you need to reproject DEMs to that projection before rendering shaded reliefs. To reproject a DEM in NSD Pro 6, go to the Terrain drop menu and select Reproject Terrain. DEM resolution • DEM resolution = Equatorial circumference of Earth (40,075,017 meters) divided by world map width (in pixels). For example, a web map of the entire Earth at zoom level 2 has a width of 1,024 pixels. 40,075,017 divided by 1,024 = 39,135.8 meters/pixel. • My recommended DEM resolutions assume a 1:1 relationship between DEM width and the width of rendered shaded relief. To use zoom level 2 as an example again, the shaded relief would be 1,024-pixels wide. The DEM used to create it is also 1,024-pixels wide. • Because of computer memory limitations, most large-scale DEMs used to create web reliefs do not span the entire width of Earth. They usually represent local areas, such as a state or national park. You can look up the dimensions of large-scale DEMs in NSD Pro 6 from the Terrain/Terrain Info drop menu. The height and width of the DEM appears as rows and columns, which equate to pixels. Use these dimensions to set the size of the shaded relief you are rendering. DEM resampling • It is very unlikely that you will find a DEM at exactly the right resolution for rendering a shaded relief for the web. The solution is to change (resample) the resolution of your DEM to the appropriate resolution specified in the chart above. • Always resample a DEM from higher to lower resolutions—going the other way can yield a shaded relief with inferior graphical quality. For example, SRTM30 Plus elevation data has a resolution of about 930 meters/pixel. You should only resample SRTM30 Plus for rendering shaded reliefs for zoom levels 0-7, all of which have coarser resolutions. • NSD Pro 6 offers two ways to resample DEMs: 1) Go to Terrain/Set Terrain Sample Distance. 2) When reprojecting a DEM to the Web Mercator projection a window appears asking you to specify the sample distance. More on DEM resampling • Optionally, you can resample DEMs to slightly coarser resolutions to produce more generalized shaded reliefs. This is especially useful at intermediate scales (zoom levels 5-13) that tend to look too noisy. The chart above offers suggested resampling amounts for these zoom levels. • If you employ DEM resampling to generalize a shaded relief, be sure to render it at the original (i.e. larger) size. Before resmpling the DEM in NSD, go to Terrain Info and note down its dimensions. Vertical exaggeration • When creating shaded reliefs, there is an inverse correlation between map scale and the vertical exaggeration applied to DEMs. Small scale shaded reliefs will appear flat if not enough vertical exaggeration is used. The vertical exaggeration values in the chart above are a suggested starting point; depending on your design goals and taste, use more or less exaggeration. ESRI, for example, renders relief with considerably more vertical exaggeration at smaller scales. Click here for the ESRI vertical exaggeration chart. • In NSD Pro 6, go to Terrain/Vertical Exaggeration Factor to adjust the vertical exaggeration. DEM smoothing • A single application of smoothing (a weighted filter using each elevation point and its immediate neighbors) removes tiny details and rough edges from the DEM, yielding a more generalized shaded relief. This is a desirable trait on busy maps with dense information overprinting the shaded relief backdrop. • To smooth a DEM in NSD Pro 6, go to Terrain/Smooth Terrain. Apply smoothing only after the sample distance has been set. Shaded relief rendering • In NSD Pro 6, go to Render/Render Shaded Relief Map to render the shaded relief. When rendering is done save the relief (File/Save As) as a TIFF image with the Create World File option selected. This will save the shaded relief with embedded georeferencing information. • NPS relief rendered with a 15% gray background can have too much lowland tone, especially when combining the relief with other map area colors. To lessen the lowland tone, simply choose a gray background lighter than 15%.
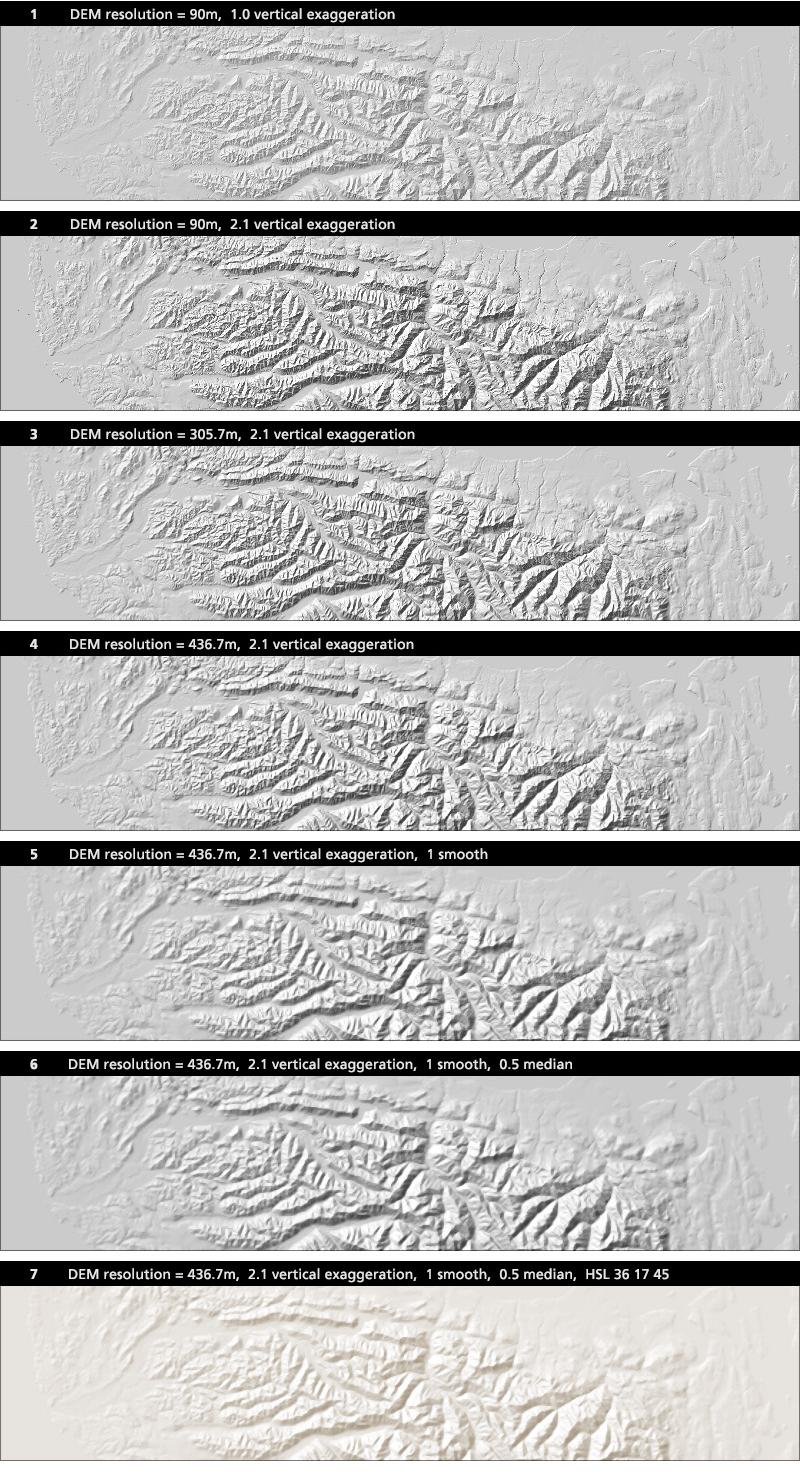
Photoshop Tips Georeferencing • Editing a GeoTIFF shaded relief in Adobe Photoshop will remove the georeferencing information when it is resaved. Fortunately, there are two ways to circumvent this problem: 1) Use NSD Pros's Copy GeoTIFF tags feature found in the Overlays drop menu. This function will restore the georeferencing information after Photoshop has stripped it out. But you need to save the original NSD shaded relief and edited Photoshop relief as separate TIFF files and with identical image dimensions. 2) With Avenza's Geographic Imager plugin for Photoshop installed, you can manipulate a GeoTIFF shaded relief as you like and resave it as a TIFF with georeferencing intact. This occurs automatically. Color • The NPS shaded relief received a Hue/Saturation/Lightness adjustment (H=36, S=17, L=45) that transformed it from gray to beige. To do this, go to Image/Adjustments/Hue Saturation. You need to also select the Colorize option. • Additionally, to reduce contrast on the NPS relief, I added a layer of flat beige (sampled from the ocean) on top of the relief at 20 percent normal opacity. Median filter • Some NPS reliefs employ median filtering (Filter/Noise/Median) to further reduce graphical noise and enhance overall crispness. I usually limit median filtering to a radius of 1 pixel, the minimum amount possible. However, despite this limitation, it is possible to obtain lesser amounts of median filtering. Go to Edit/Fade immediately after applying median and adjust the slider to a percentage of your liking. Seeking simplicity: the following reliefs of the Olympic Mountains, Washington, (zoom level 9) highlight the production steps described above. |
|||||||||
 |
|||||||||
My thanks to the following people for their help: Mamata Akella, Miles Barger, Aileen Buckley, Brett Casebolt, and Nathaniel Vaughn Kelso. |
|||||||||