Tom Patterson, US National Park Service
1) Atmospheric haze
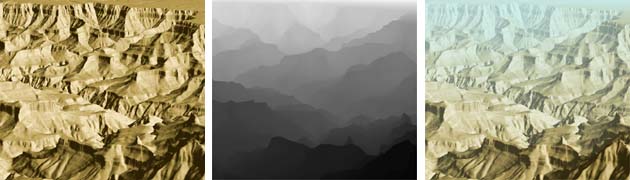
Applying haze to Bryce scenes made from DEMs is almost impossible because of the small size of DEMs within the greater Bryce 3D environment-- haze tends to apply uniformly throughout the DEM without giving a sense of visual depth. However, there is a simple and better solution. After rendering a scene in the usual way without haze, re-render it with the distance render option selected (click the triangle to the right of the render buttons for the dialog box). This will produce a grayscale image depicting nearby terrain with darker values and background terrain with lighter values. The distance render looks quite artsy by itself, but we have more practical uses in mind for it. In Photoshop, create a second layer above the Bryce landscape and fill it with light blue, gray, white, or, whatever color you want the haze to be. Next, add a layer mask and paste the distance render into it. The layer mask will diminish the amount of haze from foreground to background taking into account the effects of intervening topography. If you don't like the haze color, try another, or adjust the layer opacity.
The left image shows an unadorned Bryce render of the
Grand Canyon produced from 10 meter DEMs. The middle image is a distance
render of the same scene. The right image shows haze created in Photoshop
with the distance render acting as a layer mask.
2) Bryce materials
Advice you probably won't heed: avoid using Bryce's material presets for depicting terrain on cartographic products. They are difficult to control, lack geographic accuracy, and playing with them consumes vast amounts of time. Draping maps, art, aerial photographs, and satellite images onto DEMs is a much more accurate and faster approach -- with, perhaps, a modest amount of bump mapping added for organic realism. I sometimes apply fractured rock textures to alpine mountains, rubble to desert lowlands, and tiny soft bumps to forests. Bump map textures combine quite nicely with draped imagery. Also, think of 3D rendering as an intermediate production step. Render multiple copies of a scene with different terrain textures and merge them later in the controlled environment of Photoshop.
When draping an image onto a large Bryce terrain comprised of tiled
DEMs, it is necessary to tile the image to be draped. The Canvas Size command
in Photoshop works well, if not tediously, for precise slicing and dicing
of images. Be careful that the image tiles are square and are in perfect
register with the DEM tiles that they are associated with. The draped images
can have a much higher resolution than the DEMs underneath, yielding crisp
linework and textures in the final render.
3) Bryce cloudscapes
Consider rendering clouds as a separate element to be added to a scene later in Photoshop. Some of the most interesting skies in Bryce, such as clouds converging toward a distant vanishing point, can only be produced when the Field of View values are very large. Unfortunately, these large values also grotesquely distort terrain, requiring the sky and the terrain to be rendered separately. If you decide to swap a new sky into a scene, make sure to render it with the same light, shadow, and haze colors as the original landscape.

Except for the Field of View, both cloudscapes have identical
settings. The left image was set at 60 and the right image at 140.
4) Making shaded relief in Bryce
Bryce renders great looking shaded relief. The problem is setup. Here are few tips to help you along:
A. Launch Bryce and immediately delete the default infinite plane. Go to top view.
B. Go to File/Document Setup. Set the resolution to a square shape, say, 800 x 800 pixels, that fills most of the Bryce document window. Height will be the constraining dimension.
C. Import the DEM to be rendered. I highly recommend using 16-bit data.
D. With the DEM selected, set the terrain color to flat gray, which is the second choice in the "Simple & Fast" material presets.
E. Use the resize widget in the Edit palette to resize the DEM (on all axis) to fill the document window. Don't worry about the little bit of background color that appears around the edges. Note: If you are using a tiled DEM, group it before resizing.
F. Very important: In the Sky and Fog Palette, set shadows to zero. Next, click the little triangle near the lighting trackball and deselect "Link Sun to View." Place the sun position near the upper left horizon.
G. Use the Object Attributes dialog to vary the Y (height) value. By increasing height the relief will look more dramatic and three dimensional, something that is not always desirable for shaded relief, but difficult to resist!
H. When adjusting the lighting and height, try to create tones that range from nearly black in the deepest shadows to nearly white in the highlights. Detail should be visible in all areas.
I. When the the shaded relief is set up to your satisfaction, go to File/Render to Disk. The shaded relief will render in the background at any size or resolution you want. In the meantime you can do other work, albeit with a CPU hit.
J. When the shaded relief has finished rendering, go to the Render Options dialog (click the triangle to the right of the camera trackball) and select "Altitude Render." This option will render a grayscale DEM (actually it is RGB, it just looks gray) that will register perfectly to the relief you just created.
The following tips describe some of the cartographic effects you can
create in Photoshop with a grayscale DEM and shaded relief.
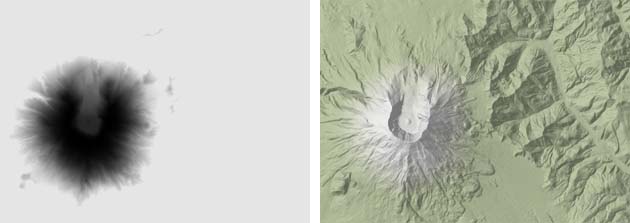
5) Lowland green
Open a grayscale DEM in Photoshop. Experiment with the
curves or levels adjustments to isolate lowland areas, vary the tonal density,
and adjust the threshhold between light and dark. Colorize the results
to your taste using the Hue Saturation Lightness adjustment (click the
colorize option). Finally, place the shaded relief on a second layer and
surprint using multiply blending mode. The example above is Mt. St. Helens.
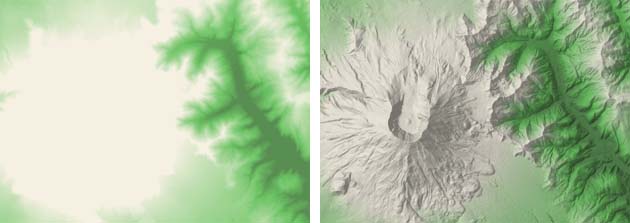
6) Snow mask
Open a grayscale DEM in Photoshop. Use the curves adjustment
to isolate highland areas, which will appear light. Invert the results
(Command-I), and the highlands will now appear dark. Use this as a layer
mask against background land tones -- but, do not use with the surprinting
shaded relief -- to give mountains a snow-capped appearance. Snow masks
appear very realistic when combined with satellite images and aerial photographs,
emphasizing prominent mountain ranges that otherwise would be indistinct.
They also work well when combined with lowland green, described above in
Technique 5.
7) Two-color height blends
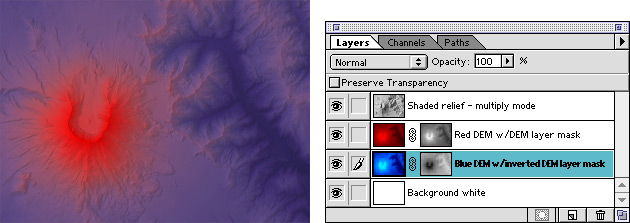
By emulating the Photoshop layers configuration shown
above (ignore my psychedelic colors!) two color height blends can be easily
created. The colored DEM layers are set to normal blending mode.