Tom Patterson, US National Park Service
Introduction
Digital shaded relief production spares contemporary cartographers from the tedium of manual methods. Despite production advantages, digital relief generally lacks the graphic sophistication of manually produced relief. Regardless of which rendering software is used, most digital shaded reliefs look monotonously similar and lack the necessary graphical cues to help readers comprehend complex topography. To give cartographers a relief presentation alternative, this tutorial introduces an automated Photoshop procedure for transforming typical digital shaded relief to the style used on Swiss topographic maps. The procedure incorporates graphic presentation concepts developed by the late Eduard Imhof, the eminent Swiss cartographer and artist, which are described in his classic book, Cartographic Relief Presentation.
![]() Click
here to see a 1:100,000-scale shaded relief created by Eduard Imhof.
Click
here to see a 1:100,000-scale shaded relief created by Eduard Imhof.
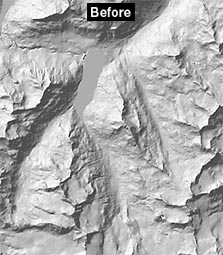
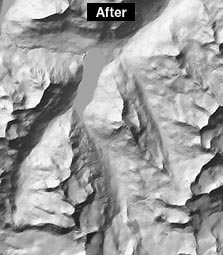
Digital shaded relief (before and after) Photoshop conversion to a pseudo Swiss style. The high contrast (values range from 3 to 85% black) is typical of Swiss shaded relief, which is printed with light inks. The example shown above is Bielerhöhe, Austria, site of the 1998 German Society of Cartography,High Mountain Specialty Group Workshop.
Aerial perspective
The aerial perspective effect is an essential design component of traditional shaded relief, which is based on natural observation. The concept is familiar to anyone who has hiked up a mountain--the veiling effects of atmospheric haze cause topographic features in the distance to look fainter than features in the foreground. When aerial perspective is applied to map shaded relief, higher topographic features should be shown with slightly more contrast than lowland features because they appear closer to readers who, theoretically, view the map from above.
Computer-generated shaded relief does not account for aerial perspective and often applies undue graphic prominence to low elevation topography, thus diminishing three dimensionality. Fortunately, there is a simple procedure for introducing aerial perspective to digital shaded relief. To implement the procedure you will need a shaded relief and the grayscale DEM (click here for a sample) used to create the shaded relief--both items must be in register. Follow these steps:
1) Open the grayscale shaded relief in Photoshop and duplicate the relief on a second layer.
2) Select the topmost relief layer. Go to curves (Image/Adjust/Curves) in the drop menu. Adjust the curve to remove a little value from the illuminated slopes. Value in the shadowed slopes should remain mostly unchanged.
3) Add a layer mask to the topmost relief layer (Layer/Add Layer Mask/Reveal All) and paste the grayscale DEM into the mask (Option-click on the mask icon in the layers palette to enable pasting). Because the DEM is darker at low elevations, the masked shaded relief will lose lowland tone.
Tip: The curves adjustment can be applied to the layer mask containing the grayscale DEM to vary the elevation and fade-out rate of the masked relief .
4) Change the blending mode to multiply in the topmost relief layer. This will add the data in the topmost relief layer to the layer below, increasing the contrast at higher elevations. Vary the opacity of the topmost relief layer to increase or decrease the amount of aerial perspective effect. Flatten the Photoshop file when finished.
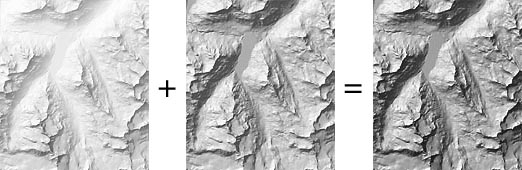
The aerial perspective effect is achieved by combining shaded relief layers. The topmost relief layer (left) is masked by a grayscale DEM to remove value from low elevations. Shadow values on the original shaded relief should not exceed 70% (middle). Contrast and shadow values increase on high elevation slopes in the composite relief (right).
Generalization
Digital shaded relief is often plagued by excessive highlight and shadow detail that detracts map readers from seeing broader topographic patterns. The problem is especially acute when shaded relief is derived from high resolution sources or when the shaded relief is used with overlying thematic map information. The blur filter is the most common technique for generalizing (smoothing) shaded relief, however, it often creates more problems than it solves. For example, alpine ridges become too smooth when the blur filter is applied globally, altering the signature characteristic of the landscape.
The median filter is a better tool for generalizing shaded relief. In Photoshop, the median filter is used by graphic designers to remove dust and scratches from historical photographs, or facial blemishes from portraits, while simultaneously preserving edge detail in areas of high contrast. When applied to a shaded relief the median filter smoothes topographic irregularities on slopes and, amazingly, retains the rugged characteristics of ridge tops and canyon bottoms. The median filter does not affect registration (unless applied excessively) between shaded relief and drainage lines. Using the median filter is very simple:
1) Highlight the relief layer to be generalized and go to Filter/Noise/Median.
2) Adjust the radius (measured in pixels) until the desired amount of generalization appears in preview. This is best accomplished when viewing the relief at actual size. Once you have determined the correct amount of generalization, increase the radius by one increment (for example, from 3 to 4) and click ok.
3) In the last step, go back to the filter drop menu and select fade median. Keep the blending mode on normal and decrease the opacity, which will reintroduce detail onto the generalized relief surface. To start, try using about 50% opacity.
Automation
A downloadable Photoshop Action (a type of script) is provided that will automatically apply the techniques described above. Using the Photoshop Action is straightforward:
1) Prepare a grayscale Photoshop file with two layers as shown in the illustration below. Shaded relief must be placed in the top layer and a grayscale DEM in the bottom layer. Select the top layer prior to using the action.
2) Open the Photoshop Actions palette. Go to the palette menu (click the arrow in the upper right corner), select Load Actions... SwissRelief. The SwissRelief Action will appear as a folder in the palette.
3) Open the SwissRelief folder and highlight the layer called Relief Action. Click the play arrow at the bottom of the palette. After several seconds the converted shaded relief will appear.
Note: To successfully convert shaded relief to the Swiss-style, you will probably need to tailor the Relief Action settings to the size, resolution, and topographic characteristics of your shaded relief. You can do this by opening the Relief Action and double clicking the layers for Curves, Median, and Fade Median.
![]() Download:
Photoshop 5.0 Action (Macintosh/Binhex)
Download:
Photoshop 5.0 Action (Macintosh/Binhex)
Imhof, Eduard: Cartographic Relief Presentation. Ed., Harry J. Steward. de Gruyter. Berlin/New York. 1982.
Special thanks to Dr. Karel Kriz, Institute for Geography, University of Vienna, for providing the splendid shaded relief and grayscale DEM of Bielerhöhe, Austria.