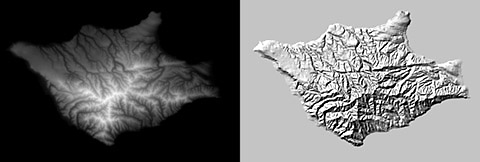
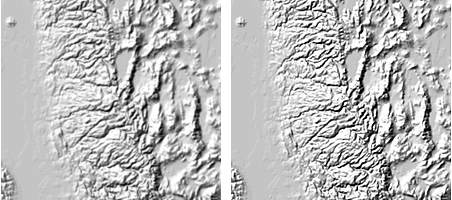
USGS DEM data of Santa Rosa Island, California in grayscale format (left) is used to generate texturized shaded relief (right).
Tom Patterson
US National Park Service
Update - April 2004: I stopped using the Photoshop technique described below for creating shaded relief years ago. Much better software now exists for creating high-resolution shaded relief based on 16-bit DEM data instead of 8-bit data, which yields coarse results. The Presentation Techniques discussed at the end of this article still remain valid.
Cartographers often have mixed opinions about shaded relief. Although shaded relief is valued as a design option for presenting understandable and aesthetic terrain on maps, it is frustratingly difficult to produce. Heretofore, the prerequisites for creating shaded relief have been artistic talent and/or the mastery of complex and expensive software. Today, however, relief shading is undergoing democratization thanks to the accessible tools of desktop publishing. In this article I discuss shaded relief production and presentation techniques using Adobe Photoshop 4.0, the popular graphics program in which many cartographers have dabbled.
Photoshop offers practical advantages to cartographers for producing shaded relief. Many cartographers already own this desktop program. It is relatively easy to use, and can (by digital standards) generate reasonably attractive shaded relief. Photoshop offers powerful interactive tools to manipulate the rendered shading for final presentation. Many output options are available, including print-ready PostScript files and JPEG files for the Web.
Using a graphics application such as Photoshop for cartographic production is not without problems. One problem is the importation of Digital Elevation Models (DEMs), the data upon which digitally-generated shaded relief are based. Photoshop does not import raw DEM files. Third-party utilities are needed to convert raw DEM's (text files of elevation values) to 8-bit raster images that Photoshop will recognize. The converted DEM's will be 256-level grayscale images that show highlands with light values and lowlands with dark values. Each pixel in the grayscale image corresponds to a sampled elevation point on the original DEM. A list of freeware and shareware DEM conversion utilities is provided on the Web site. They are well documented and easy to use.
USGS DEM data of Santa Rosa Island, California in grayscale format
(left) is used to generate texturized shaded relief (right).
The procedure for creating shaded relief in Photoshop is straightforward: Open a Photoshop RGB file with a white background, insert a grayscale DEM into an alpha channel, and apply a lighting filter that interacts with the DEM to generate a "bump map" texture that simulates shaded relief. If this process sounds unfamiliar, relax. Shaded relief can be created without difficulty by following the recipe below. To execute the recipe you will need a grayscale DEM. A sample DEM is posted on the Web site for you to use.
Recipe for quick and easy shaded relief
Ingredients:
--Photoshop 4.0
--Grayscale DEM data
--Ample RAM (at least 16 MB is needed to work on the sample DEM)
Serving Size:
Shaded relief in square or rectangular shapes at any size up to the 30,000 x 30,000 pixel limit of Photoshop.
Preparation:
Note: Keyboard shortcuts are shown for the Mac OS. For Windows use simply substitute the Control key for the Command key.
1) Launch Photoshop and open a grayscale DEM. Make sure the background color at the bottom of the toolbar is set to white.
![]()
2) With the DEM visible as the Background layer, choose "select all" (Command A), and then "cut" (Command X). The Background layer should become white.
3) Change the color mode from grayscale to RGB by choosing "Image/Mode/RGB Color" from the pull down menu.
4) Open the channels palette from the pull down menu (Window/Show Channels). Create a new alpha channel by clicking the "Create new channel" button at the bottom of the palette. An alpha channel (#4 ) will appear at the bottom. Paste (Command V) the grayscale DEM into the activated alpha channel.
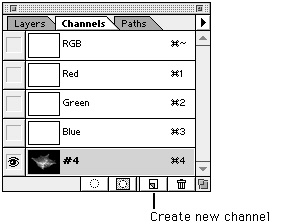
5) Click the top "RGB" channel to make it active. The DEM disappears, and the background becomes white. The eye icon should be visible in all channels except #4. Activate the layers palette by clicking the "Layers" tab.
6) From the pull down menu choose "Filter/Render/Lighting Effects." Enter:
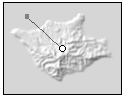
7) On the left side of the dialog box is a graphical device for setting light direction and altitude. Select the small square at the end of the tethered line and drag toward the upper left to set northwest illumination. Dragging away from the center circle lowers the light source altitude, turning the preview black. Drag too close to the center and the preview turns white. Place the square about two thirds of the way between the center and upper left corner of the preview box for best results. Experiment.
8) Now for the moment of truth. Click "okay" to render the shaded relief. Notice that the rendered relief looks much better than it did in the dialog box preview. If the relief doesn't look right, use "undo" (Command Z) and return to the lighting effects dialog. Try adjusting the intensity, flat/mountainous setting, and the light direction and altitude until the results are pleasing.
Presentation Techniques:
Photoshop offers almost unlimited ways to manipulate shaded relief graphically. The following is an overview of techniques preferred by the author.
Reproducible results: Settings in the Lighting Effects dialog box can be saved for applying identical properties to other reliefs. The saved settings appear in the "Style" pop-up menu. Also, the Actions Palette allows the cartographer to record and save most graphical manipulations performed on a relief. The saved "action" can be replayed at a later time for replicating a presentation style.
Sharpening: Relief generation is an interpolative process that can give relief an unfocused look. Applying a moderate amount of Unsharp Mask (Filter/Sharpen/Unsharp Mask) will make shaded relief look crisper. Try these settings on a 72 dpi relief: Amount 150%, and Radius 0.5 pixel. Nudging the threshold up from zero levels removes sharpening from flat areas with less contrast.
Shaded relief of the Lake Tahoe area before unsharp masking (left)
and after (right).
Layers: Before editing, always duplicate the relief to an extra layer as an insurance copy in case something goes wrong. Layers are indispensable for applying localized modifications to a landscape. For example, to sharpen an area of high mountains on an otherwise gentle landscape, duplicate the relief layer, place the duplicated layer beneath the original, and apply sharpening to the entire duplicated layer. The next step is to add a layer mask to the original relief layer. Finally, use a soft-edged paint brush gradually to open windows in the mask. This last step allows the sharpened peaks to emerge through the gentle original relief.
Painting: The quality of many DEM's is sub-optimal, which translates into unwanted visual artifacts on the final shaded relief. Common problems are: systematic banding, edge matching, elevation spikes and holes, and terracing. These problems can be disguised, up to a point, with the standard arsenal of painting tools--especially the rubber stamp, dodge, burn, blur, and airbrush tools. Be careful when using painting tools to beautify shaded relief, overuse can decrease accuracy.
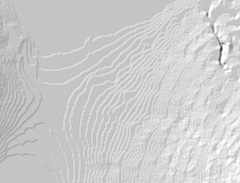
Terracing is a flaw found in some DEM's. It is most pronounced in
flat areas.
Illumination: Cultural and historical influences have made northwest illumination the convention for relief shading. Sometimes, however, strict adherence to northwest lighting fails to portray all parts of a landscape. A common problem is the flattening of northwest-trending topography, which lacks illumination and shadow contrast. This problem can be alleviated by rotating the light source up to 30 degrees in either direction from northwest. In the most troublesome cases, it may be necessary to generate two or more shaded reliefs that use slightly different light sources. Place the shaded reliefs on separate layers and use the layer mask technique to call out localized illumination.
Lowland tones: Gray value in flat areas is necessary for shaded relief to appear as a continual landscape. However, too much value in lowland areas can interfere with the presentation of thematic map data. To solve this problem, adjust settings in the Lighting Effects dialog box to lighten lowland values without unduly diminishing mountainous areas. Elevating the light source and increasing ambience serve to lighten the entire relief. Simultaneously increasing the mountainous setting will replace lost contrast in rugged areas. Also, lowland tones can be lightened after a shaded relief has been generated. Use the Brightness/Contrast controls (Image/Adjust/Brightness/Contrast...) to make global adjustments and the dodge tool--selecting a soft-edged brush--for localized touch-ups.
Resampling: Photoshop renders shaded relief at the same resolution as the grayscale DEM, typically 72 dpi. If a higher resolution is needed for print production, two methods are available: 1) Increase the resolution of the original grayscale DEM and then render, or, 2) increase the resolution of the shaded relief after it is rendered. Neither technique yields additional terrain detail but, only larger file sizes. In the opposite situation, excess detail can obscure larger, more important, topographic features. This problem can be remedied by downsampling (generalizing) the grayscale DEM before generating shaded relief.
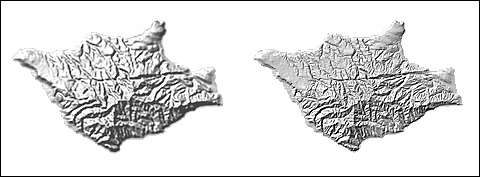
Shaded relief generated from low resolution (left) and high resolution
(right) versions of the same DEM.
Elevation color: The 3D look of a landscape can be enhanced by blending shaded relief with continuous-tone elevation colors derived from the grayscale DEM. Accomplish this by pasting the DEM on a new layer beneath the shaded relief, then colorizing the DEM using HSB controls (Image/Adjust/Hue, Saturation...). After colorizing the DEM, set the surprinting shaded relief to "multiply" blend mode (in the layers palette) and adjust the opacity of the relief and DEM layers until the right look is achieved. Multiply blend mode emulates traditional screen printing by adding the color of upper layers to those beneath.
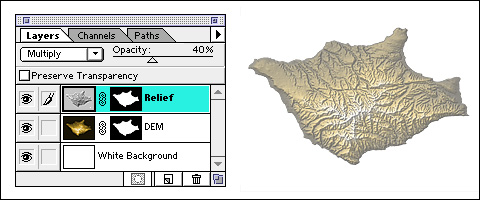
Blending gray shaded relief and colorized DEM data.
Hypsometric tints: Accurate hypsometric tints can be produced by applying the threshold command (Image/Adjust/Threshold) to a grayscale DEM. The threshold command creates area masks that can define each of the 256 grayscale levels (elevations) in a DEM. To calculate the elevation of a single grayscale level, in feet or meters, divide the elevation range of the DEM (DEM conversion utilities report this) by 256.

Hypsometric tint layers shown at 500 foot intervals.
Needed Photoshop Capabilities
Additional cartographic functionality could be brought to Photoshop via plug-in filters, in the same way Avenza MAPublisher has brought Geographic Information Systems (GIS) functionality to Adobe Illustrator and Macromedia Freehand. Such cartographic plug-in filters would help to bridge the gap between the PostScript-centric world of presentation cartography and GIS.
Conclusion
With the steps covered in this article cartographers now have an avenue to easily produce shaded relief to enhance the geographic quality of the maps they produce. Further exploration by cartographers using Photoshop should yield additional useful techniques.