Colorizing grayscale Digital Orthophoto Quadrangles (DOQs) in Photoshop
|
|
|
 |
|
 |
|
|
|
| Introduction
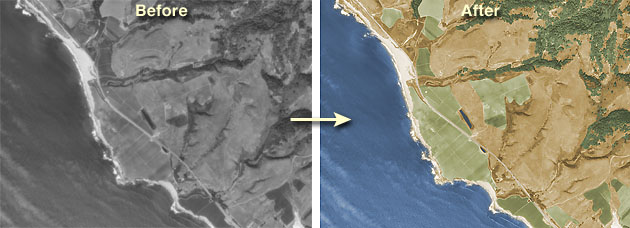
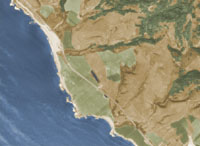
It is a fact of life for cartographers that large-scale color aerial photographs are usually scarce and expensive. By contrast, USGS Digital Orthophoto Quadrangles (DOQs) are inexpensive, in the public domain, available for most of the US, and register to perfectly 1:24k USGS DLGs and DEMs. However, there is a caveat—in most cases DOQs are available only in grayscale format.
This tutorial offers a solution to the color limitation of DOQs with a technique in Photoshop for transforming grayscale images to ersatz natural color. The colorized DOQs can then be used for a variety of cartographic purposes, including background images for 2D maps and draping images on DEMs for creating 3D landscape visualizations. The procedure for colorizing DOQs is easier with images depicting visually uniform environments, such as deserts; rural areas lacking intricate road systems; landscapes with few dark shadows cast by steep terrain, and at smaller scales.
The step-by-step procedures outlined in the tutorial are based on a sample DOQ, in Photoshop format (.psd), showing the California coast near Half Moon Bay south of San Francisco (shown above).
Download the sample DOQ (188k).
Tom Patterson
US National Park Service
Division of Publications
Harpers Ferry, WV, USA
25425-0050
|
|
|
|
|
Part 1 - Making area selections
|
|
Note: The sample DOQ includes pre-saved area selections allowing you to skip Part 1 of the tutorial to immediately begin experimenting with the color adjustments described in Part 2.
Before the colorizing fun can begin, you first must select the portions of the DOQ to which colors will be applied. In the case of the sample DOQ of California, five selections will be saved: the ocean, ponds, agricultural lands, a road, and forests. At first glance, it would seem like a daunting task to isolate selected areas from tonal chaos of a black and white aerial photograph. But the job is made relatively easy by the automated selection tools available in Photoshop. Nonetheless, some manual drawing of selections is required, often used in conjunction with the automated tools. On a typical DOQ, with a little practice, selections can be accomplished usually within minutes rather than hours. If colorizing a single DOQ seems like a chore, be grateful that you aren't colorizing a classic black and white movie. Casablanca, for example, runs for one hour and 42 minutes and contains 183,600 frames, each requiring consistent colorization.
Properly identifying areas to be selected on a DOQ is critically important. For example, on a grayscale image a dirt parking lot looks very similar to a fallow farm field. To minimize the possibility of interpretive blunders, I familiarize myself with a DOQ by consulting topographic maps and, if possible, conduct a field check of the area.
|
|
|
|
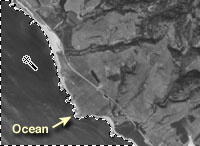 |
Ocean: In the first step, you will use the Magic Wand tool to select the Pacific Ocean surface on left side of the DOQ. Double click the Magic Wand icon in the toolbar. When the Magic Wand Options dialog appears, enter a tolerance value of 50. The higher value (0 is the default) enables the Wand to make a contiguous selection of the range of tonal values found on the shimmering ocean surface. Click the Wand near the spot indicated on the image to the left. Most of the ocean surface should fall inside the selection boundary that appears. If unwanted land areas are selected too, deselect (Command-D) and try again, perhaps with a lower tolerance setting. Conversely, if small portions of the ocean remain unselected, add these to the main selection by Shift-clicking within the unselected areas with the Wand tolerance set somewhere between 0 and 15, using the Lasso selection tool with the Shift key depressed, or by selecting Select/Grow from the top drop menu. Name and save the selection when done.
|
|
|
|
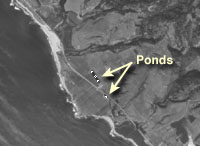 |
Ponds: Using the Magic Wand tool again, select the two small farm ponds indicated on the image to the left (zooming to 400% magnification helps). Set the Wand tolerance to about 10 and Shift-click in the darker water areas until the surfaces of both ponds are completely selected. Name and save the selection when finished.
|
|
|
|
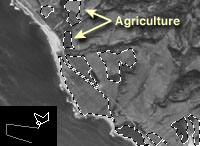 |
Agriculture: The agricultural fields on the DOQ are characterized by very dark and light values and straight bounding lines, which makes the Magic Wand inappropriate for making selections. Instead, you need to select the fields manually by using the Lasso and Polygonal Lasso tools (see the inset at lower left). Depressing the Option key allows you to toggle between the two tools on-the-fly for selecting areas with both straight and irregular boundaries. This exercise might seem a little tedious at first, but in a few short minutes the farm fields can be selected with high precision. Name and save the selection when finished
|
|
|
|
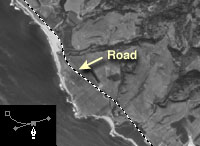 |
Road: The best method for selecting the road, characterized by consistent width throughout its entire length, is by manually using the pen tool (see the inset at lower left). Briefly, follow this procedure: 1) Use the Pen tool to draw a Bezier path down the center of the road just as you would in a drawing application such as Illustrator, 2) Select the Airbrush tool in the Toolbar, 3) In the Brushes palette, create a brush 2 pixels in diameter with the hardness set to 75, 4) Set the foreground color to white at the bottom of the Toolbar, 5) In the Channels palette, create a new channel, name it "Road," 6) In the Path palette, stroke the path with the foreground color (white) by clicking on one of the little icons at the bottom of the palette, 7) Finally, delete the working path since it is no longer needed (simply hit the Delete key when the path is selected). If everything was done correctly, a new selection, called "Road," should be saved with the file. The important concept to remember is that channels and selections are one and the same in Photoshop.
|
|
|
|
 |
Forest: To select forests (the discontinuous dark areas at the upper right) use the Magic Wand with a tolerance setting of 20. Shift-click until all of the clumps of trees are selected. Name and save the selection. Don't worry if the selection extends into non-forested areas with similar dark tones, such as adjacent agricultural fields. You can subtract these areas from the forest selection in the Load Selection dialog by invoking the "Subtract from Selection" option.
|
|
|
|
|
|
Part 2 - Colorizing the image
|
|
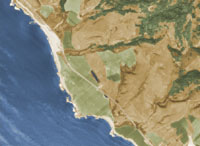
Colorizing the DOQ requires the same attention to detail as making the initial selections. Care must be taken assigning colors to the image, establishing a geographic mood. Unlike a movie where scenes are colorized purely for artistic reasons—for example, Ingrid Bergman's dress in Casablanca could be shown in any pleasing hue—the colors you choose for a DOQ must accurately represent geographic reality. To capture the signature colors of a region I refer to color landscapes photographs; coffee table books, postcards, and tourism websites are good resources. These sources more closely approximate landscape colors as people experience them, since color aerial photographs are usually more muted than the colors that are seen on the ground. To make DOQs more natural appearing, use restraint when assigning colors, especially with the saturation settings.
One of the keys to successfully colorizing a grayscale DOQ is identifying a representative base color to assign to the entire image, on top of which other colors will be added. In the case of the sample DOQ, the golden brown of California in midsummer was chosen as the base color.
The procedure below is based on successively applying Hue/Saturation/Lightness adjustments to the selections that you created in the first part of this tutorial.
|
|
|
|
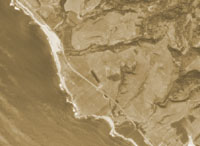 |
Land: First, in the drop menu go to Image/Mode and change the mode from grayscale to RBG; without the mode change color corrections cannot be made. Next, go to Image/Adjust/Hue/Saturation. When a dialog box appears, check the colorize box at the lower right. Set Hue = 40, Saturation = 30, and Lightness = 30 to change background color to brown. Don't worry about the brown appearing in the ocean, you will fix that in the next step.
|
|
|
|
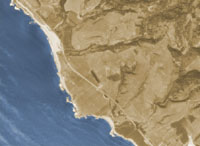 |
Ocean: In the drop menu go to Select/Load Selection and choose the ocean channel that you saved earlier. Since an indistinct surf line defines the land/water boundary, you should feather the selection edge slightly to better reflect reality. In the top drop menu go to Select/Feather, set the Feather Radius to 2 pixels. To colorize the ocean, return to the Image/Adjust/Hue/Saturation dialog and check the colorize box. Set: Hue = 215, Saturation = 25, and Lightness = 0, or choose another blue more to your liking.
|
|
|
|
 |
Forest: Load the forest selection using the same procedure described above and go to Image/Adjust/Hue/Saturation. This time do not check the colorize box (by not checking the colorize box adjustments are made to the base color itself, instead of creating a completely new color as was done earlier). Set: Hue = 40, Saturation = -50, and Lightness = -5.
|
|
|
|
 |
Agriculture: You should be familiar with the general procedure by now. Load the agriculture selection, open Image/Adjust/Hue/Saturation dialog, do not click the colorize box, and set: Hue = 25, Saturation = -40, and Lightness = 0.
|
|
|
|
 |
Ponds and Road: Use the same procedure described above.
The pond settings are Hue = 170, Saturation = -70, and Lightness = 0
The road settings are Hue = 0, Saturation = -30, and Lightness = 0
|
|
|
|
|
|
Part 3 - Finishing touches
|
|
|
|
 |
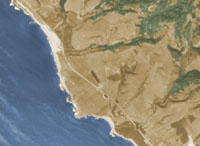
Contrast: The colorized DOQ appears a little flat. By adjusting curves (Image/Adjust/Curves), contrast can be added to the image. The curve should assume a shallow "S" shape, accomplished by adding control points to the curve profile and adjusting the input and output values (click here to see an example).
The curve settings used to adjust the image on the left can be downloaded by clicking here.
|
|
|
|
 |
Sharpening: Judicious use of unsharp masking (Filter/Sharpen/Unsharp Mask) brings the image into sharper focus. I used these settings: Amount = 180, Radius = 0.4, Threshold = -3. The values used for optimal unsharp masking vary greatly depending on the resolution of the image and the use to which it will be put.
|
|
|
|
|
|
|
|
Return to Shaded Relief home
|
|
|
|
|
|
|
|