Making 3D Terrain Maps |
||||||||||
--Light Settings |
||||||||||
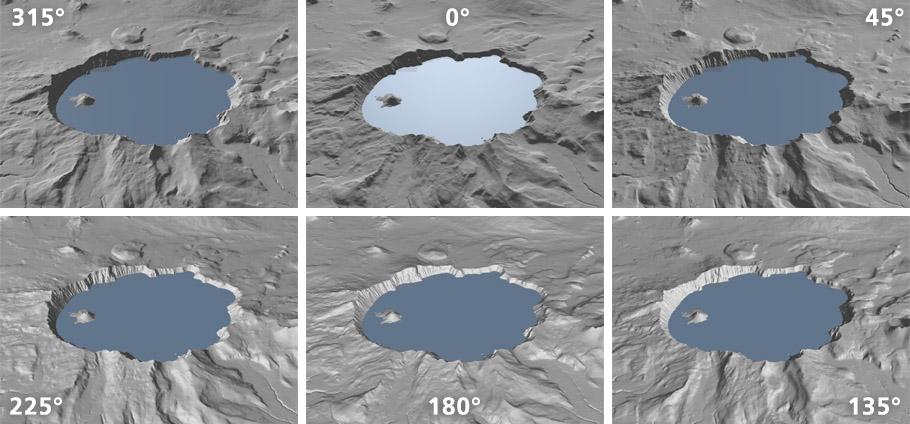
The light settings used for 3D terrain mapping can vary greatly, depending on terrain characteristics, data quality, map purpose, etc. Personal preference is also a factor—a few quick adjustments can change the look of your map from cheery to dreary. The light settings in Natural Scene Designer Pro are discussed next. Although the various settings are treated as separate topics for narrative convenience, be aware that they interact with one another. Picking the right combination of light settings requires experimentation. Direction For north-oriented maps, the best light direction is either from the southeast (135°) or southwest (225°), which you can vary about plus or minus 30° starting from both. Of the two directions, I prefer southwest light because it is closer to the northwest light used for 2D shaded relief, fostering consistency. Southeast light can cause relief inversion on small-scale 3D maps, although large-scale maps illuminated from the southeast generally do not suffer from this. At large scales, I will use southeast light if does a better job of defining the terrain, such as this map of Maui from a previous page. Avoid light coming anywhere from the north (315°, 0°, and 45°) because it will place dense shadows on slopes facing the reader. The overall scene will be backlit and darker. You should also avoid light coming from due south (180°), which can wash out a scene. |
||||||||||
 |
||||||||||
Light direction study, Crater Lake, Oregon. Light generally coming from the southwest (225°) and southeast (135°) works best for 3D terrain mapping. |
||||||||||
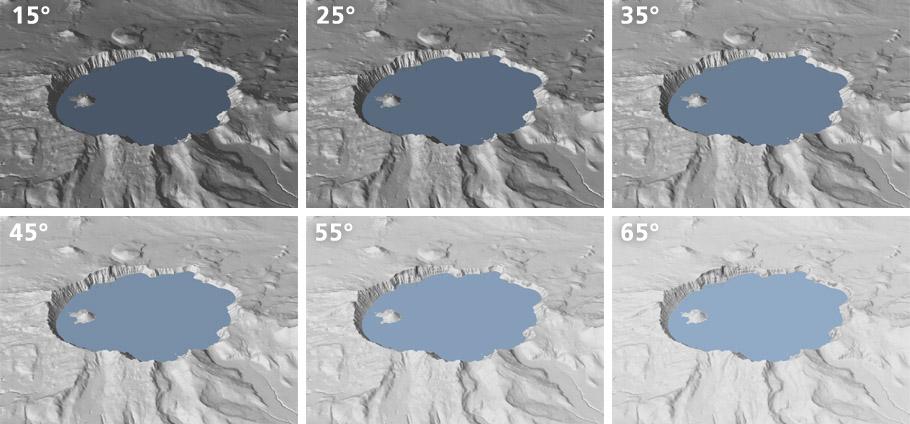
Elevation angle Think of this setting as the height of the sun during the course of a summer day. At dawn or sunset (0°) the sun is at the horizon and Earth's surface is semi-dark. At noon (90°) the sun is nearly overhead and the land awash in bright light. For photographers, the best time to snap pictures is very early or late in the day when the light is most dramatic and the shadows deeper. For cartographers, the best time to render 3D scenes is when the sun is still low, but a bit higher and brighter so as to enhance clarity. Most of my scenes use light at elevations ranging from 20° to 50° above the horizon. |
||||||||||
 |
||||||||||
Light elevation study. Avoid using light from very low and high elevations. |
||||||||||
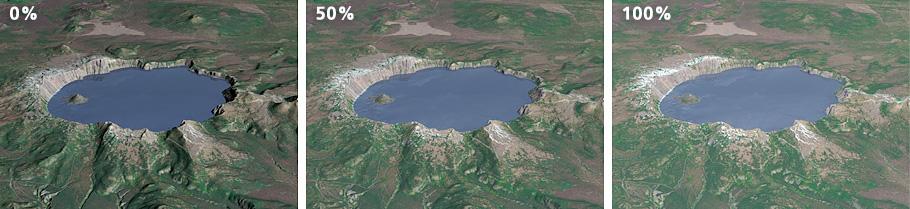
Ambient light Ambient light in 3D software behaves in unusual and useful ways. In Natural Scene Designer Pro, it is omni-directional and always white. It only affects the highlights and shadows in a scene, which decrease in intensity as the ambient light increases. In the illustration immediately below, the terrain surface is flat gray, which is all that remains at 100% ambience (bottom right map). The second illustration features a Landsat image draped on the terrain surface. At 100% ambience the Landsat image is free of highlights and shadows generated by Natural Scene Designer Pro. Maps rendered at higher ambient light settings (16% is the default in NSD Pro) have a softer appearance and purer colors. I usually set ambience anywhere from 25% to 50% when draping aerial photographs or satellite images on terrains. The lighter, less contrasting terrain improves the readability of final maps that have labels. |
||||||||||
 |
||||||||||
Ambient light study. Greater ambience creates ghosted scenes. |
||||||||||
 |
||||||||||
A Landsat 8 image draped on a DEM. Note the disappearance of highlights and shadows at 100% ambience. |
||||||||||
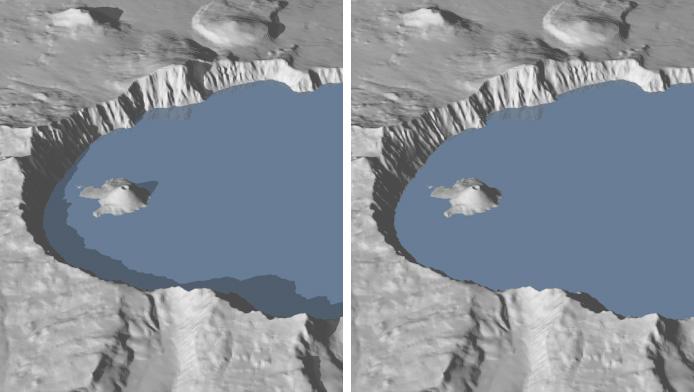
Cast shadows The option for "shadows" is on by default in Natural Scene Designer Pro, which calculates the shadows cast by high terrain and adds them to your scene (see illustration below). Cast shadows add a realistic touch to large-scale scenes, especially those close in enough to reveal buildings and individual trees. However, when the 3D camera is at higher altitudes, the inclusion of cast shadows can create confusion on small-scale scenes. In rugged terrain the shadows cross over to facing slopes, obscuring where the valley bottoms are. The vector rivers in these valleys then appear misregistered with the terrain. Cast shadows are very dark at low ambience. |
||||||||||
 |
||||||||||
Crater Lake scenes with (left) and without (right) cast shadows. |
||||||||||
Tip: Shadow Mask Rather than rendering cast shadows embedded in your scene, you can render them as a separate image in Natural Scene Designer Pro. Specify Shadow Mask as the Render Mode in the Render Window. The program will render the cast shadows as a black and white mask at the same pixel dimensions as your scene file. You can then place the Shadow Mask in a Photoshop layer mask to apply shadows to your scene in any color or opacity. |
||||||||||
 |
||||||||||